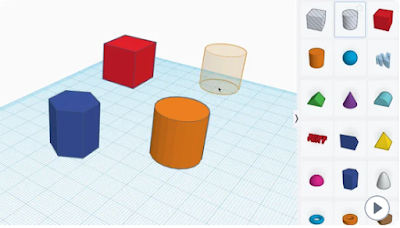
Tinkercad is a simple and
user-friendly platform that revolutionized the world of 3D modeling. Perfect
for beginners, it also provides powerful tools for developing programming, prototyping and tutorial projects. By allowing users to easily
modify shapes and objects, Tinkercad makes the once-intimidating practice of 3D
modeling accessible to everyone. Combined with 3D printing technology, tangible
creations can be made quickly, encouraging innovation and creativity. Whether
you're an aspiring engineer, hobbyist or educator, Tinkercad opens up a world
of possibilities for turning ideas into reality with just a few clicks.
Here are the basic steps to start
designing in Tinkercad:
Step
1: Sign up and login https://www.tinkercad.com/
Create
an account: Visit
the Tinkercad website and sign up for a free account if you don't already have
one.
Log
in: Log in to your
account to access the Tinkercad dashboard.
Step
2: Start a new project
Create
a New Design:
Click the "Create New Design" button on your dashboard to start a new
project.
Step
3: Familiarize yourself with the workplace
Workspace
Overview: Take a
moment to familiarize yourself with the TinkerCAD interface. The workspace
includes a grid area where you build your models, a toolbar on the left with
various shapes, and navigation tools on the top and right.
Step
4: Add Basic Shapes
Drag
and drop: Select a
basic shape (eg box or cylinder) from the Shapes menu on the right and drag it
to the workspace.
Resize
and Position:
Click on a shape to resize it and position it using the handles. You can also
enter exact dimensions in the shape properties panel.
Step
5: Combine the Shapes
Add
more shapes: Drag
additional shapes to the workspace as needed.
Group
Shapes: Place
shapes related to each other. Select multiple shapes by holding the Shift key
and clicking on them, then click the "Group" button to combine them
into a single object.
Step
6: Modify the shapes
Use
Tools: Use the
tools on the toolbar to modify your shapes. For example, you can rotate, stack,
and mirror objects.
Create
Holes: Convert
shapes to holes to cut sections from other shapes. Drag a shape onto the
workspace, select it and click the "Hole" button, then group it with
another shape to subtract its volume.
Export:
Once you are
satisfied with your design, click the "Export" button in the upper
right corner of the screen.
Choose
Format: Choose the
file format you want to export your model to (eg, .STL for 3D printing).
Step
8: Save and Share
Save
your work:
Tinkercad automatically saves your work, but you can rename your project by
clicking on the project name at the top of the screen.
Share: Share your design with others by
clicking the "Share" button and creating a link or sharing directly
to the Tinkercad community.
Step
9: Explore more features
Learn
and Experiment:
Explore Tinkercad's tutorials and community projects to learn more advanced
features and techniques.
Practice: Keep practicing by creating new
designs and experimenting with different tools and shapes.
By following above steps, you can
start designing 3D models in Tinkercad, turning your ideas into digital
creations that can be 3D printed.
Few interesting things to explore
in Tinkercad
Circuit
Design: Play
around with creating and simulating electronic circuits using Tinkercad's
circuit editor.
Codeblocks: Experiment with codeblocks to
create parametric designs using visual programming.
Shape
Generators:
Explore custom shapes and tools created by the community to enhance your
designs.
3D
Printing: Learn
how to optimize your models for 3D printing, including tips for adding supports
and ensuring printability.
Collaborative
Projects:
Collaborate with friends or classmates by sharing your projects and working
together.
Community
Gallery: Browse
the Tinkercad Community Gallery for inspiration and download designs made by
others.
Lesson
Plans: Explore
Tinkercad's educational resources, including lesson plans and activities for
teachers and students.
Import 2D and 3D files: Import SVG
files to create 3D models from 2D designs or bring in other 3D models for
further customization.
Getting started with Tinkercad is easy and fun!
https://www.tinkercad.com/learn
https://www.youtube.com/@AutodeskTinkercad


Comments
Post a Comment